


How to Make a Drop Down Navigation Bar

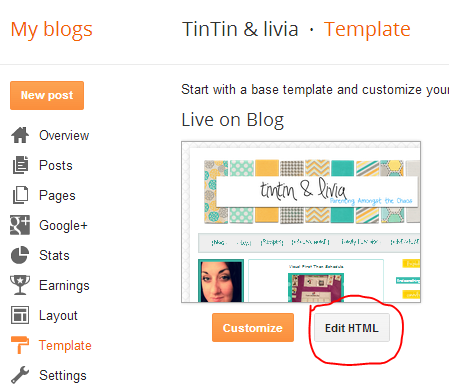
Did you back up your template? If not do it now. This is part two of creating a drop down navigation bar for Blogger. In this section we will be getting into HTML/CSS so your template needs to be backed up.
After backing up your template (if you haven't already done so)
Click Ctrl + F for your search box to pop up and type in showaddelement.

It should say showaddelement=no. Change the no to yes. It should look like this:

Click on the gadget that says Pages and remove. Add a HTML gadget in it's place.

Open notebook or word. And let's begin on forming your tabs! Copy and paste this code into your word processor. This code is for people not using images:
<!-- start navmenu -->
<div id='NavMenu'>
<div id='NavMenuleft'>
<ul id='nav'>
<li><a href='LINK'><Category 1></a>
<ul>
<li><a href='URL LINK TO LABEL/WEBSITE/PAGE'>SUB-CATEGORY 1A</a></li>
<li><a href='URL LINK TO LABEL/WEBSITE/PAGE'>SUB-CATEGORY 1B</a></li>
</ul>
</li>
<li><a href='LINK'><Category 2></a>
<ul>
<li><a href='URL LINK TO LABEL/WEBSITE/PAGE'>SUB-CATEGORY 2A</a></li>
<li><a href='URL LINK TO LABEL/WEBSITE/PAGE'>SUB-CATEGORY 2B</a></li>
</ul>
</li>
<!-- ADD MORE CATEGORIES HERE -->
</ul>
</div>
</div>
<!-- end navmenu -->
Place your links where it says LINK. Place your tab names where it says CATEGORY/SUB-CATEGORY. If you want more than one post to show up in a subcategory or page (like a blog roll) I would suggest using http://YOUR-BLOG-NAME.com/search/label/YOUR LABEL CATEGORY. Then whenever you want a post to show up under that tab use your Labels under post settings.
You can add as many sub-categories as you need. Just copy, modify it for the subcategory needed, and paste it under your category.
<li><a href='LINK'><SUB-CATEGORY'></a></li>
If you need more tabs, use this code:
<li><a href='LINK'><Category></a>
<ul>
<li><a href='URL LINK TO LABEL/WEBSITE/PAGE'>SUB-CATEGORY 1A</a></li>
<li><a href='URL LINK TO LABEL/WEBSITE/PAGE'>SUB-CATEGORY 1B</a></li>
</ul>
</li>
If you want to use an image in your tab instead of plain text in the categories use the code below. Use the URL from where your image is hosted.
<!-- start navmenu -->
<div id='NavMenu'>
<div id='NavMenuleft'>
<ul id='nav'>
<li><a href='LINK'><img src='YOUR IMAGE URL'></a></li>
<li><a href='LINK'><img src='YOUR IMAGE URL'></a>
<ul>
<li><a href='URL LINK TO LABEL/WEBSITE/PAGE'>SUB-CATEGORY 1A</a></li>
<li><a href='URL LINK TO LABEL/WEBSITE/PAGE'>SUB-CATEGORY 1B</a></li>
</ul>
</li>
<li><a href='LINK'><img src='YOUR IMAGE URL'></a>
<ul>
<li><a href='URL LINK TO LABEL/WEBSITE/PAGE'>SUB-CATEGORY 2A</a></li>
<li><a href='URL LINK TO LABEL/WEBSITE/PAGE'>SUB-CATEGORY 2B</a></li>
</ul>
</li>
<!-- ADD MORE CATEGORIES HERE -->
</ul>
</div>
</div>
<!-- end navmenu -->
You can also put the <img src="url"> code into the sub-categories, but, I would not recommend it. For that section I would just recommend typing out the name of the label/page.
Once you have your basic layout how you want it copy and paste into your HTML gadget and click save. Your blog will look pretty funky right now. Don't worry about it.
Now we are going to add some style to your navigation bar, save and go back to template.
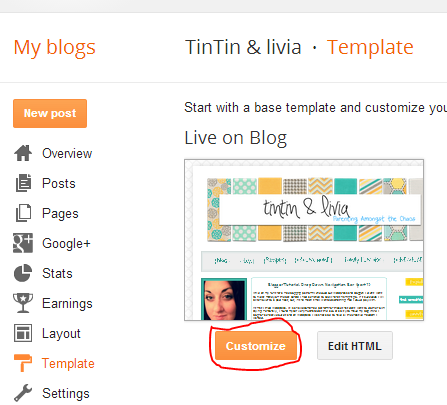
Select customize. Go into Advanced. Scroll down and select Add CSS. Feel free to play around with the highlighted areas
/* -----first link navigation color & boarder----- */
.tabs-inner .section:first-child ul { margin-top: 0px; border: 0px solid/dashed/dotted #eeeeee; }
/* -----navigation background & boarder----- */
.tabs-inner .widget ul { background: #999999; border: 0px solid/dashed/dotted #eeeeee; text-align: center !important; }
/* -----rollover links----- */
.tabs-inner .widget li.selected a, .tabs-inner .widget li a:hover { color: #eeeeee; background-color: #ffffff; text-decoration: none; }
/* -----links font, boarder & color----- */
.tabs-inner .widget li a { font: normal normal 14px coming soon; color: #2e968a; border: 0px solid/dashed/dotted #ffffff; }
/* -----center navigation----- */
.tabs .widget li, .tabs .widget li{ display: inline; float: none;}
#NavMenu {
background:#FFFFFF;
margin: 0 auto 0;
padding: 0; }
#NavMenuleft {
float: LEFT/NONE/RIGHT;
margin: 0;
padding: 0;
border: 0px solid #FFFFFF; }
#nav {
margin: 0;
padding: 0;
border: 0px solid #FFFFFF; }
#nav ul {float: left; overflow:visible; list-style: none;}
#nav li { float: none !important; display: inline-block; list-style: none; padding:10px;}
#nav li a, #nav li a:link, #nav li a:visited { color: #2e968a; padding:10px;}
#nav li a:hover, #nav li a:active { color: #999999; text-decoration: underlined; padding:10px;}
#nav li li a, #nav li li a:link, #nav li li a:visited { background: #eee; color: #2e968a; }
#nav li li a:hover, #nav li li a:active { background: #fd868a; color: #666666; }
#nav li ul { z-index: 9999; position: absolute; width: auto; left: -999em; height: auto; margin: 0; padding: 0px; background: #ffffff;}
#nav li ul ul { margin: -32px 0 0 171px; }
#nav li:hover ul ul, #nav li:hover ul ul ul, #nav li.sfhover ul ul, #nav li.sfhover ul ul ul { left: -999em; }
#nav li:hover ul, #nav li li:hover ul, #nav li li li:hover ul, #nav li.sfhover ul, #nav li li.sfhover ul, #nav li li li.sfhover ul { left: auto; }
#nav li:hover, #nav li.sfhover { position: static;}
Once you have everything looking the way that you want it, save, and be proud! You just made your own navigation bar!


